 800.978.5174
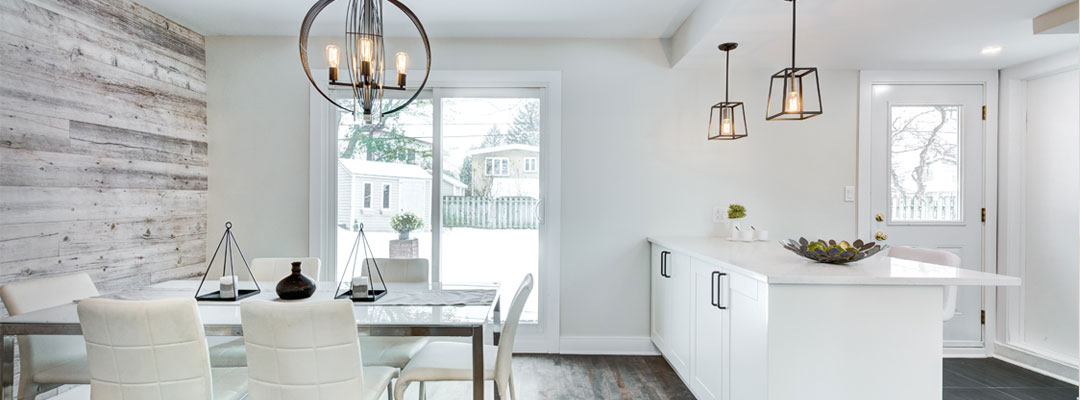
The quality of smartphone cameras continues to improve year after year. And virtually every agent carries one around in their back pocket.
So the question of whether you can take “good” listing photos is no longer relevant. Of course you can. And you can do it on your own with relative ease.
But the infinitely more important question to ask is: “How can my listing photos be so great they help me sell more homes?”
“Good” photos might be easy to snap, but they can just as easily miss the point (and ruin a would-be offer). Sorry for the pun, but that point reframes the whole discussion to be more about noticing the difference between bad real estate photos and photos that capture the heart as well as the eye.
After this article, you’ll learn how to take real estate photos so you’re better equipped to choose which ones to include on your listing description, regardless of whether you hire it out or do it on your own.
Why the Quality of Your Listing Photos Matters
Real estate photography can make all the difference between attracting one low-ball bidder and several interested buyers with competing offers – thus generating more choices for the client, and bigger commissions for you.
According to NAR, ninety-five percent of home buyers use the internet to search for homes, and nearly nine in 10 buyers under the age of 57 rated listing photos as the most useful feature an agent could have on their website.
So it’s not outlandish to assume that your listing photos are almost exclusively responsible for creating a positive first impression. If “a picture’s worth a thousand words” – about your client’s listing! – they’d better be favorable words! Your commission income could depend on it.
7 Lessons To Learn From Bad Real Estate Photos
If you’re a diehard DIY-er and you’d prefer to take your real estate photography into your own hands, reading through a how-to guide from a pro is one option.
But sometimes it’s quicker to learn the right way by noticing the wrong way. Plus, learning from others’ mistakes is less painful (and funnier?) than learning from our own.
1. Get a Camera

Chances are, your smartphone can take great real estate photos. But even if you have the best lenses and photo editing apps available, your phone simply can’t match the professional quality of a high-end digital camera.
We could bog you down with a lot of technical jargon about physics, foreground blur, telephoto zoom, background compression, and so on. But we’ll leave it up to the professionals at Digital Photography School to explain the reasons why cameras are better than smartphones.
2. Capture the Right Shots
Hopefully, your listing photos help your potential buyers form a complete “picture” in their imagination of what their life would be like if they lived there. And let’s also hope that’s a good thing!
First, be sure your listing isn’t missing anything that would be conducive to that end. Include all of the shots that buyers will be interested in (see the list below), and complement them with compelling marketing copy. (To get started, get four real estate listing description examples and learn the best practices for writing them.)
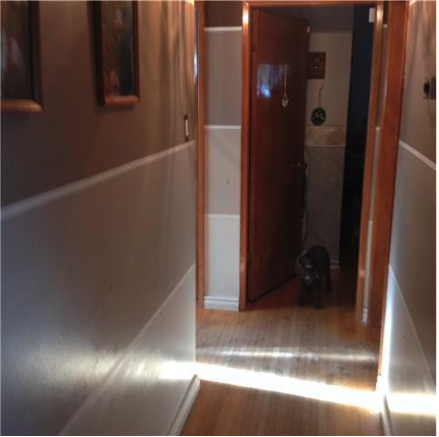
And second, don’t overdo it by taking pictures of every random hallway and corner of the house. Avoid including any images that might dissuade or even distract the ideal buyer.
The folks at ExpertPhotography.com suggest creating a standard shot list that includes, for example:
- Two wide-angle shots of each bedroom, the kitchen, and the living room.
- One photo of the bathroom, unless it’s incredibly beautiful or spacious.
- One to three photos of the backyard, unless it has some unique features. And then one to two shots of the front of the home to show off the “curb appeal.”
- One shot of each feature including the laundry room, garage, and pantry.
3. Pay Attention to Detail
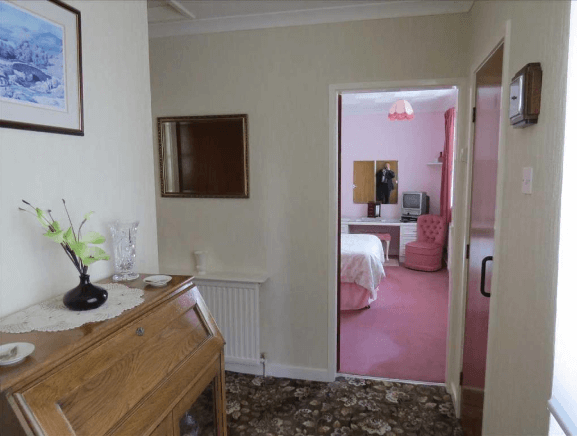
As you’re working on nailing the “big picture” items just mentioned in number two above, don’t forget to pay attention to the minor details that appear in your listing photos. Because that’s exactly what your potential buyers will be doing too.
For example:
- Put a lid on the garbage can or move it.
- Trim all the blinds and shades to the same level.
- Use some work lights to fill in dark areas.
- Use props and accessories (e.g., plants, books, tableware, candles, etc.)
- Fluff the pillows and make the bed.
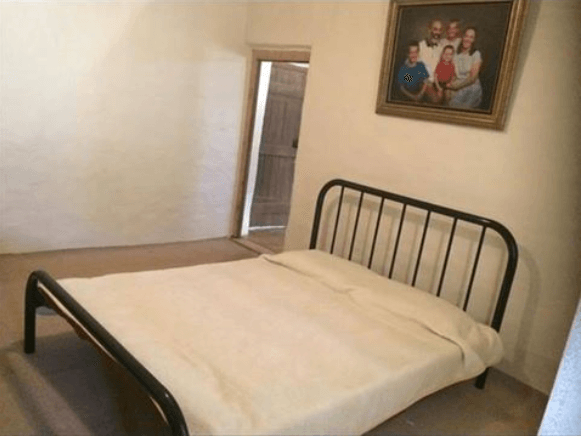
- Don’t show valuables. (Valuables plus a listing address equals an invitation to burglars.)
- Oh and by the way, make sure you don’t snap a picture of yourself in the mirror by accident.
4. Use a Tripod
Feeling dizzy? That’s not only because the resolution is poor, but also because the horizontal plane is off. You can have the highest resolution camera in the world and still end up with poor quality listing photos simply because you didn’t “shoot straight.”
Plus, unless you’re on the Olympic shooting team, your hands will be at least somewhat shaky when you click the red button, which can create motion blur and a crooked composition.
Tripods help you avoid all those amateurish mistakes, and they also allow for greater consistency throughout your collection of listing photos – you can set it to the same height to get the same vertical angles throughout.
5. Get the Lighting Right

Proper lighting is critical. It’s what helps you create warmth, spaciousness, and dimension. But it’s also what ruins an otherwise stellar shot – too dark and the space feels compressed and shadowy; too bright and the space feels cold and uninviting.
Photo editing can take care of these issues to some extent. But to save you the headache of having to fix bad real estate photos, keep these best practices in mind:
- Make sure the spaces are bright with natural light.
- Keep the brightest source of light (especially the sun) behind you.
- Make good use of your attached flash unit (by bouncing it off the walls to soften it, for example).
- Be mindful of the time of day. Pick the best time of day for your “money shots” of the interior (typically the morning), and come back when golden sunlight is pouring in the windows to get exterior and aerial shots.
Get the subtleties of lighting right and it’ll add appeal like you won’t believe.
6. Declutter

A decluttered home always appears to be more open and inviting. So do what you can to have the home picked up, organized, cleaned, and staged before you take any listing photos.
Ideally, the seller could move their nonessential belongings (including their many, many fake floral arrangements) into a storage unit to free up as much space as possible. But of course, that may be outside your control.
Also, remove any pictures of the seller and their family from your shots. Again, you want the buyer to imagine the home as being theirs, not someone else’s.
7. Sell the Dream
Average real estate agents sell houses. Expert real estate agents sell homes.
Any knucklehead can take a photo of a bare table. But it takes a bit of artistry to “sell the dream” – that is, to post listing photos that speak to the heart of your potential buyer and get them to sense that this is the home they’ve been dreaming of.
So appeal to the senses and let your photos tell a story. Cast your potential buyers as the main characters.
You can’t make the photo smell like apple pie and cinnamon, but you can make it look like it does. Set the table. Light the fireplace. Get fresh flowers. Place an open book on the coffee table. You get the idea – make your potential buyers feel “at home” even though they’re looking through listing photos online.
(Want to see more hilariously bad real estate photos? TerribleRealEstateAgentPhotos.com has years worth.)
Why You Should Hire a Professional To Handle Your Listing Photos
You now have at least a basic idea of how to take real estate photos. But in case the point hasn’t quite landed for you, high quality listing photos aren’t the easiest thing to produce. The standard for what qualifies as “great” continues to rise.
Here are some reasons why you should pass this part of your job on to the pros.
Real Estate Photography Is Not Your Area of Expertise
Real estate agents are hired to sell homes, not take (or edit) photos.
Next time you’re tempted to use your smartphone to snap listing photos, ask yourself – Would Phil Knight whip out his iPhone and snap photos for a Nike ad? No. No, he wouldn’t. He has a team of experts who take care of that for him.
And that’s because photography and photo editing are crafts that require the technical skills of a specialized expert. It’s easy to take “good” photos and it’s difficult to create “great” ones that actually help you sell.
Taking Listing Photos Is Not the Best Use of Your Time
Deep down inside real estate agents know they can’t wear all the hats in their business and still adequately serve their clients and continue to grow. Typically, it’s the agents who know how to network and delegate that move to the next level.
Even if you fancy yourself a budding photographer, you know everything there is to know about how to take real estate photos, and you have all the high-end equipment necessary – your time is better spent generating buyer and seller leads and implementing a well-rounded real estate business plan that results in a greater annual GCI.
Hiring a Photographer Is Worth the Cost
To illustrate the point, let’s use an example.
Let’s say the median listing price in your area is $250,000 and you have a commission rate of 3%. That would mean your average commission per transaction would be about $7,500.
And based on national averages, let’s say your real estate photographer charges a day rate of $400, or about 5% of your commission. Considering the level of quality they’d provide and the time they’d be saving you, that’s a small price to pay for such a significant ROI.
Of course, you’ll have to redo the math using the approximate figures for your area. But you’ll likely come to the same conclusion.