 800.978.5174
Facebook can be a bountiful source of new clients. But only if you know how to create and optimize ads.
Because unfortunately, creating high-ROI Facebook ads for real estate agents is hard. Unless you know what you’re doing, you’ll waste your budget generating few (if any) leads.
But this step-by-step article is going to show you how to do it the right way.
Let’s get started!
What Are Facebook Lead Ads?
Facebook offers several ways for businesses to create customizable posts that promote their products and services to highly specific audience segments. Most of the platform’s ad options are meant to drive traffic to a website or another Facebook page.
But Facebook “lead ads” for real estate agents are different. When the user clicks on a lead ad, it opens an information-capture form within the Facebook app, as opposed to sending them to a web page.
Lead ads are a popular choice among digital advertisers because they usually provide high lead volume at a low cost per lead, which is one of the main reasons they’re the best Facebook ads for real estate agents.
And the personal information that’s submitted is (at least theoretically) more accurate because it’s pulled from the user’s Facebook profile, which increases the likelihood that you’ll capture qualified leads. Plus, you can easily post your ads on Facebook and Instagram simultaneously, since they’re both Meta-owned platforms.
You can get clients from Facebook leads without doing any of the work! With Network Boost, Market Leader’s digital marketing experts will generate 40+ Facebook & Instagram leads in your preferred areas every month for just $350. We’ll do all of the Facebook lead generation work covered in this article for you so you can save both time and money. Learn more about Network Boost.
How To Create the Best Facebook Ads for Real Estate Agents
As with all of your other real estate social media marketing plans, it’s always a good idea to start with clear objectives that establish the who, what, when, where, and why (Step 1). From there, we’ll begin the technical process of setting up your campaign (Step 2). As part of that, we’ll create what’s called an “ad set,” which is a group of variations of similar ads (Step 3). Finally, we’ll design the ads themselves (Step 4).
Step 1: Establish an Objective
For real estate agents, Facebook ads have the best chance of generating leads if each campaign is targeted toward one group for one reason. Researchers have proven time and time again that highly focused messages that speak to the heart of a particular audience segment always outperform generic “catch-all” ads. That’s perhaps especially true when it comes to real estate agent Facebook ads.
That’s not to say there’s anything wrong with trying to reach more than one type of prospect at a time. It’s just that you should create a separate campaign for each objective.
Step 2: Set Up Your Campaign
- Sign in to your Facebook Ads Manager account. (If you don’t have one, here is an article that walks you through the process of creating an account.)
- From the toolbar on the left side, click on the hamburger (the three stacked lines), which opens up a menu. Click on “Ads Manager.”
- Click on the green button that says “Create.”
- From the “Buying type” dropdown menu, make sure “Auction” is selected, and from the list of “Choose a campaign objective” options, select “Leads.”
Here’s where you’ll set up your first campaign.
- Create a name. We recommend establishing a naming convention and sticking with it, so you can stay organized. (For example, “Buyer Leads – 2023 Buying Season”.)
- From the “Special Ad Categories,” select “Housing.” If you don’t, you’re signing yourself up for a headache as your ads are likely to get rejected as violating Facebook ads policies. Learn more about Special Ad Categories.
- You’ll also see an option to run an “A/B Test”. You certainly can, if you’d like. But for reasons we’ll explain later, it’s not necessary.
- Lastly, you’ll see an option to turn on the “Advantage campaign budget” setting. Up to you, of course, but we recommend leaving that off unless you’re fine surrendering full control of how your budget is spent to the Facebook Ads Manager.
- Click the “Next” button at the bottom right corner.
Download the complete version of The Ultimate Guide to Facebook Lead Ads for Real Estate Agents (for free)!
Step 3: Prep Your Ad Set
“Ad sets” are – you guessed it – sets of ads within a real estate agent’s Facebook ad campaign. They’re groups of what are essentially similar ads with slight variations in text and media.
You’ll see four main panels on this page, including “Conversion,” “Budget & schedule,” “Audience,” and “Placements.”
- First, name your ad set. Again, we recommend sticking to a naming convention. (For example, let’s say you’re targeting buyers in the ZIP code 12345. You could name the ad set “Buyer Leads – 2023 Buying Season – 12345”.)
Conversion
- From the list of “conversion locations,” select “Instant forms.”
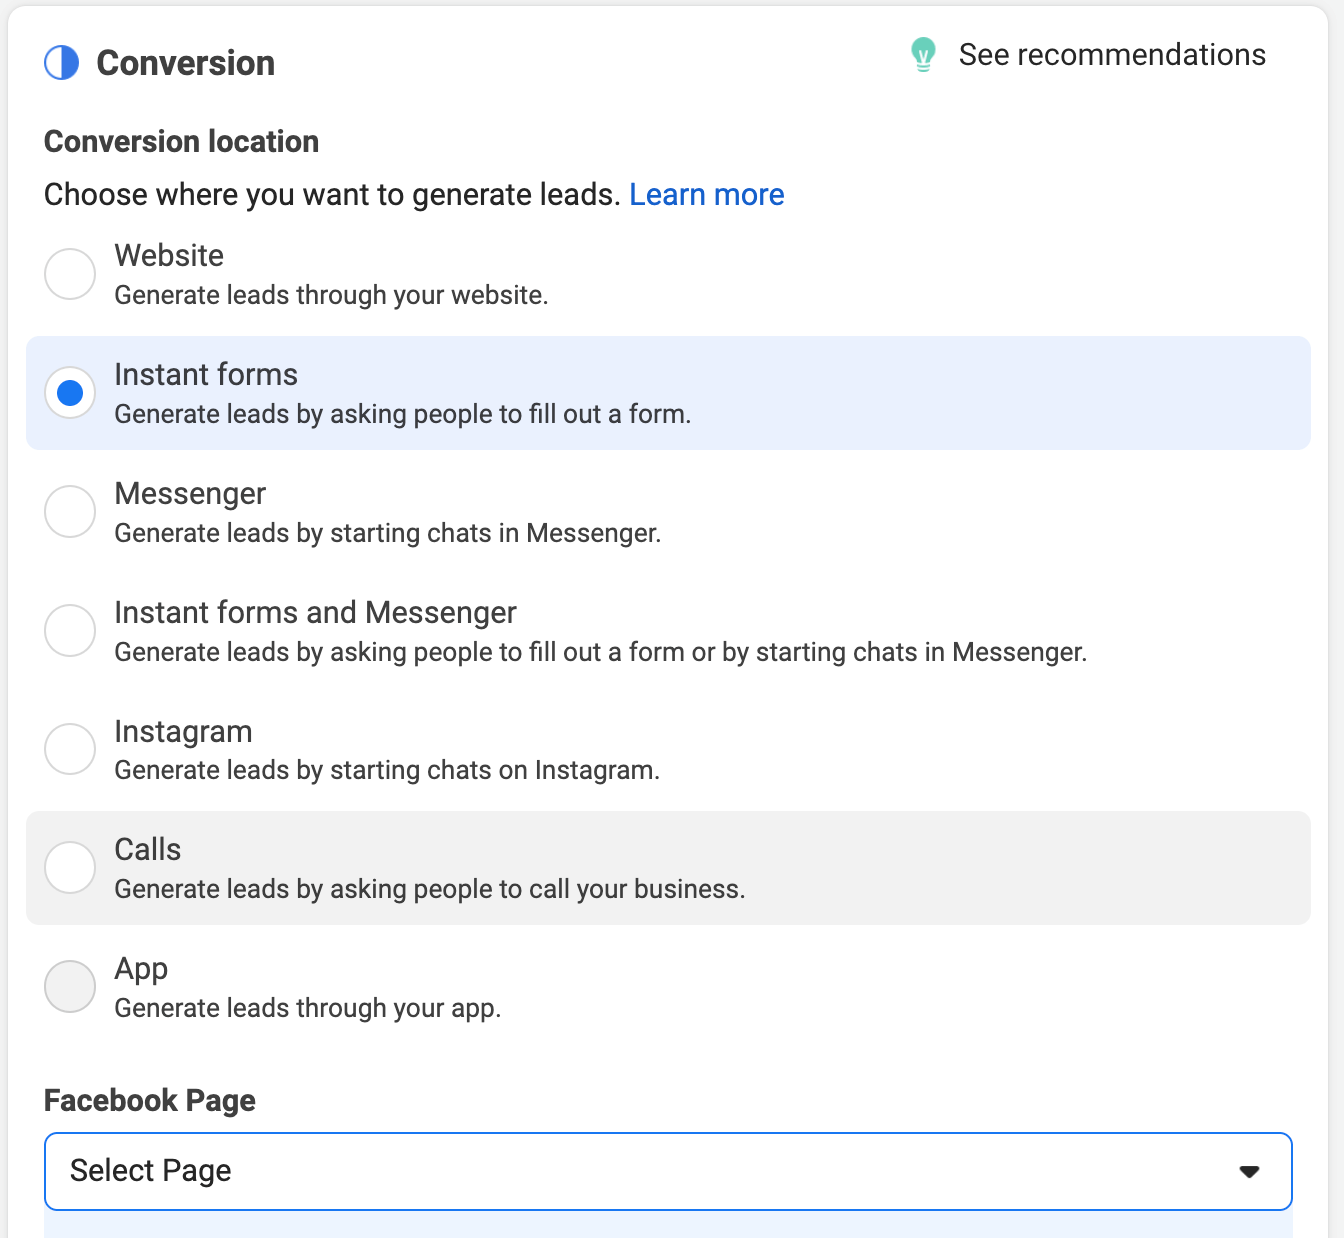
- Next, go to “Facebook Page” and select your Facebook business page from the dropdown menu.
- At the bottom of this panel, you’ll see an option to set a “Cost per result goal.” This allows you to tell the Facebook ads platform how much you’d like to spend on each lead. As Meta says, “If keeping the average cost per result around a certain amount is important, enter a cost per result goal.”
Dynamic Creative 
- Click on the “Dynamic creative” toggle to turn it on. With this setting, you can use different text and images for the same ad, and Facebook will figure out which performs best for you, which is great for those who are new to creating real estate agent Facebook ads. (Also, remember when we said the “A/B testing” option was unnecessary in Step 2? This is why. With the “Dynamic creative” switched on, it’ll automatically take care of that for you.)
Budget & Schedule
- We recommend setting a low daily budget to start off with (say, $20 per day). As you gain experience and learn from your campaigns over time, you may want to increase your budget.
- Use the default start date/time, unless you want to schedule for the future.
Audience 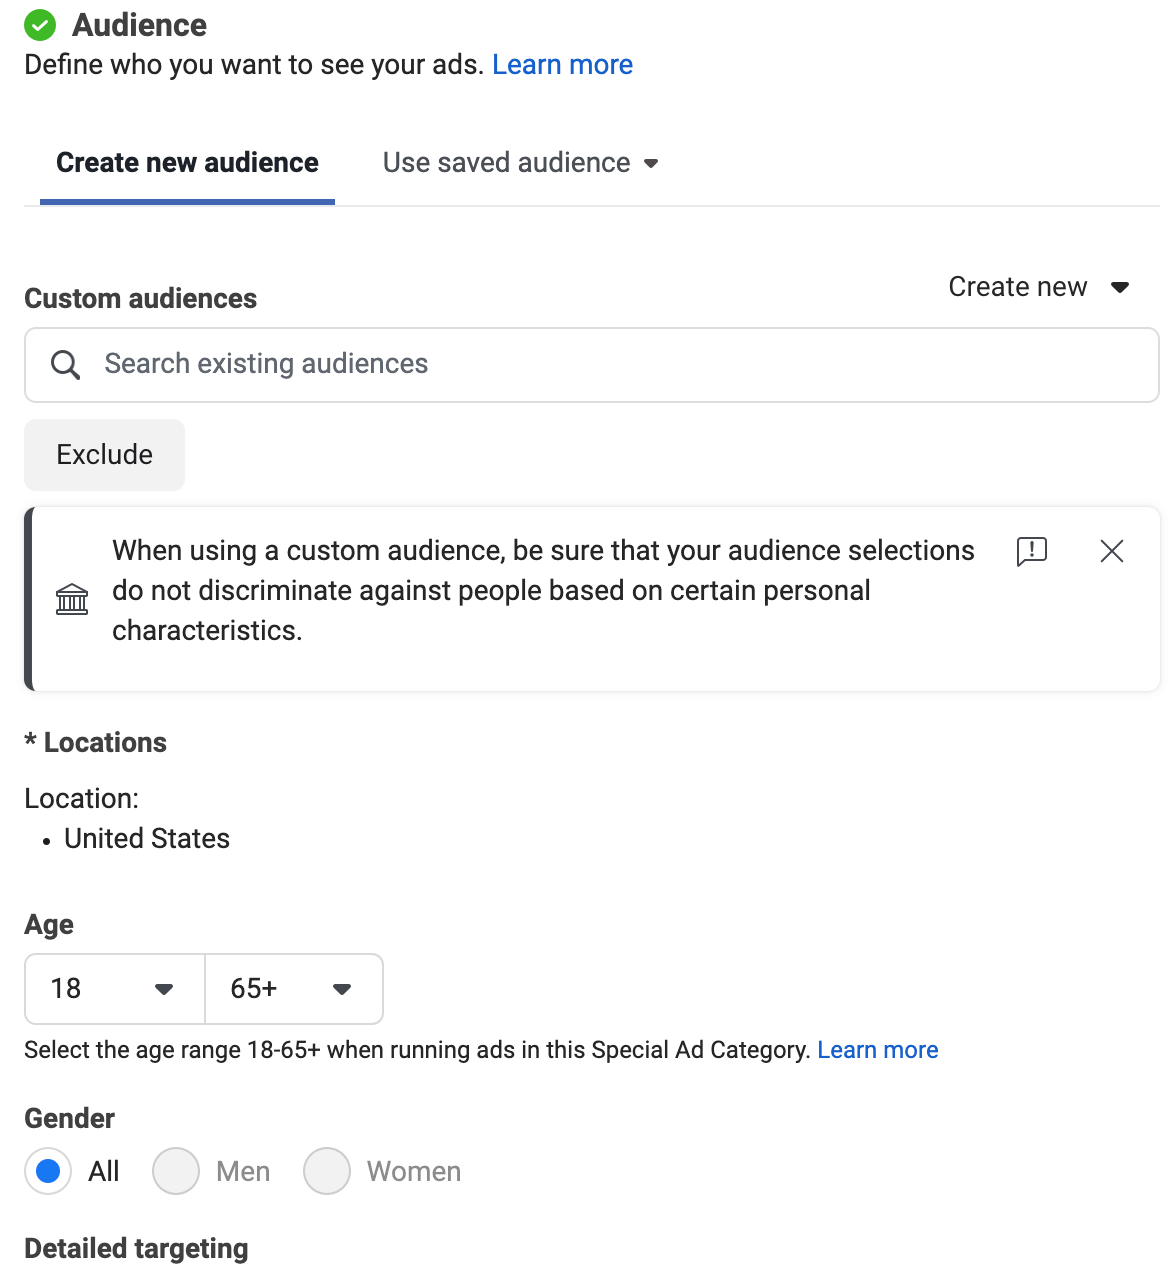
- This is where you’ll build your audience which every ad in this ad set will target. Needless to say, this is an especially important part of creating Facebook ads for real estate agents because it ensures you’re going to capture your ideal client in your target market.
- Feel free to stick with the default settings for now. As you gain more experience with audience targeting, you can further optimize your ads based on what performs best for you.
Placements
- Like Facebook, we recommend using the “Advantage+ placements” setting rather than the “Manual placements.” It’s easier for you to set up and – in our experience – just as effective as manually selecting placements.
- Click the “Next” button at the bottom right corner.
Step 4: Create Your Ad
- Now that the preliminary setup work is done, it’s time to create the ads that will appear in local buyers’ and sellers’ feeds! On this page, you’ll see several panels. Specifically, we’re going to work with “Ad setup,” “Ad creative,” “Form,” and “Tracking.”
Ad Setup 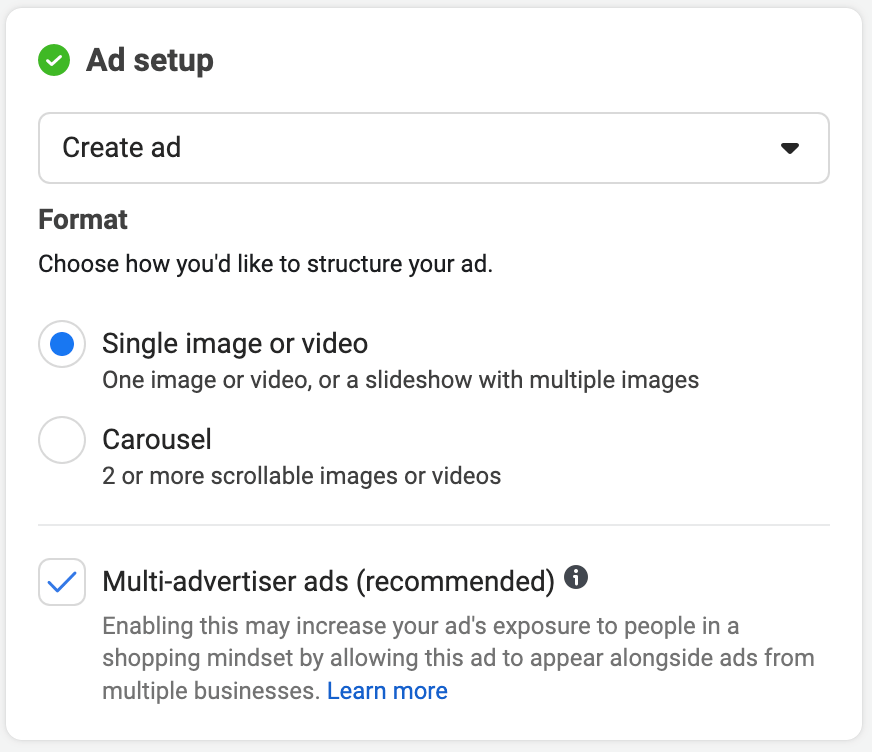
- We recommend sticking with the default settings – “Create ad,” “Single image or video,” and “Multi-advertiser ads.”
- The “Single image” option tends to be the best for real estate agent Facebook ads. Single images are easy to create (using a platform like Canva), download for free (from a site like Unsplash or Pixabay), or purchase (from sites like iStock or Shutterstock).
- Simple is okay, but boring is ignorable. So be creative with your image choices. The best images capture and hold attention.
Ad Creative
- Click on “Add media” and upload two or more images you want to use for your ad.
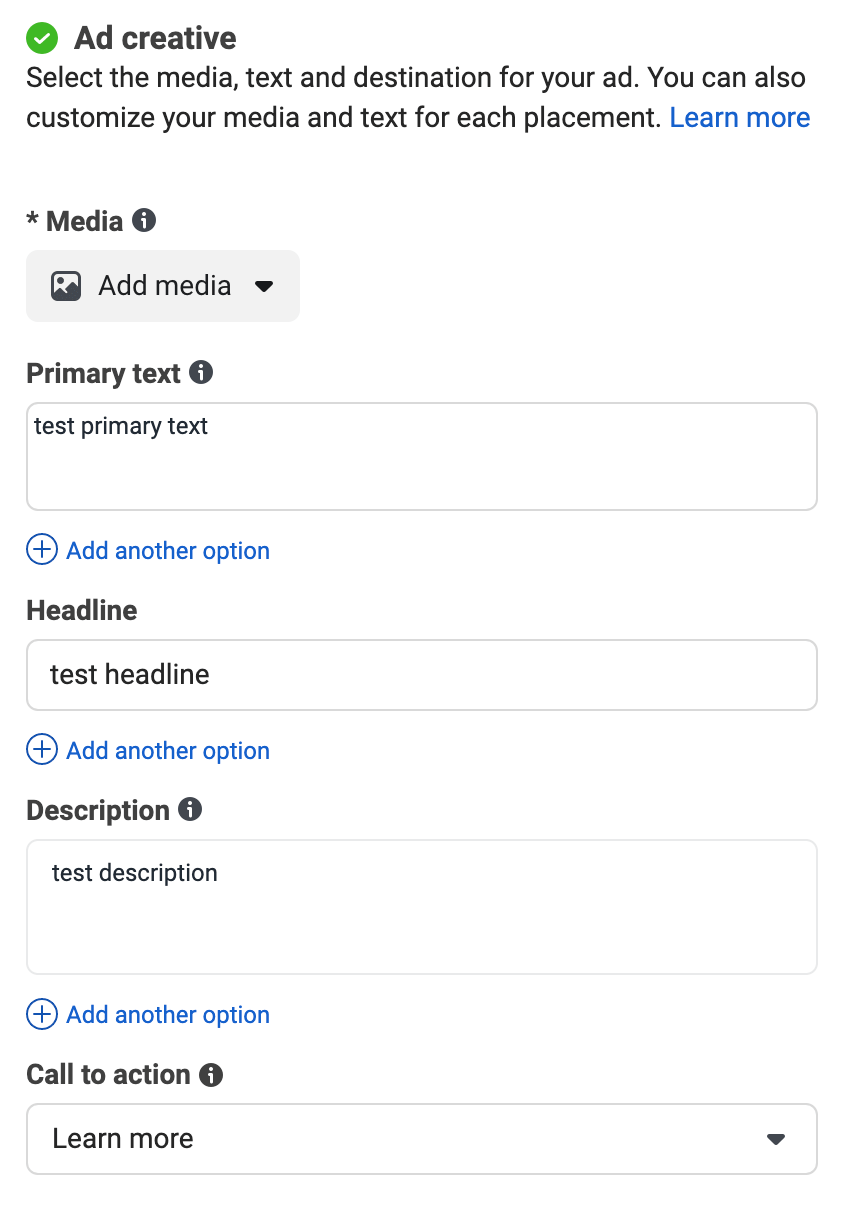
- Write a few (or more) different “Primary text,” “Headline,” and “Description” options. For each, write the first option in the space provided. To add more, click “Add another option.”
- From the “Call to action” dropdown menu, we recommend using the “Learn more” option because it’s compelling and tends to be the best fit for the content of most real estate agent Facebook ads.
Form
The form appears after a potential lead has clicked on your ad’s CTA button. It’s where your Facebook leads will fill in their contact details and submit it to you.
- Name: For easy reference, it’s a good idea to give your form a name that’s relevant to the ad’s theme.
- Form Type: Select “More volume.”
- Image: Adding an image isn’t necessary, but it’s a great way to improve the overall “feel” of your ad/form.
- Greeting: The best Facebook ads for real estate agents use a greeting. Remind people of the value you’re offering with the ad (e.g., a home valuation for seller leads or to see available listings for buyers). You can largely reiterate the ad copy here.
- Privacy Policy Page: Meta requires you to link to the privacy policy page on your website. Learn what needs to be on your privacy policy page. Don’t have one? Unfortunately, you’ll need to create one and publish it on your site, or upload a PDF version to Google Drive and link to that.
Tracking
- You don’t need to change any of the default settings on this panel.
Once you’ve completed everything on this page and the ad preview looks the way you want it to, go ahead and click the green “Publish” button at the bottom right corner.
Congratulations on publishing your first Facebook lead ad!
Get The Ultimate Guide to Facebook Lead Ads for Real Estate Agents!
 There’s much more to learn than we could cover in this article. With this free downloadable guide, you’ll get everything you need to create your own high-ROI Facebook Lead Ad campaigns:
- Complete guidance for each step in the campaign creation process
- 10 ad templates (text & images) that you can use immediately
- Tips on how to avoid wasting your advertising budget
- Instructions for targeting potential buyers & sellers in your local market with your ads
Submit your email address below to have the “Ultimate Guide to Facebook Lead Ads” sent to your inbox!
